
gfgfdsxscsdsa
hghfdg

Description of Virus:DOS/Rovnix.gen!

Today I am sharing an article to How to fix Windows 7 Not Genuine error because my friends and readers ask me to share the tutorial to make the Windows 7 genuine without using any Activator or Loader.After searching lot on Internet I found that we can also make the windows 7 genuine using Command Prompt in just 2-3 minutes.I tried this method on many computers of my friends and classmates so today I am sharing this article with you so that you can also make your Windows 7 genuine and solve the ‘This copy of Windows is not genuine’ error.If you have lot of money then I recommend you to buy original Windows 7 or Windows 8for Microsoft.So if you want to fix windows 7 not genuine error using command prompt then follow steps that given below.

Why Windows 7 Becomes Not Genuine :
Windows 7 becomes not genuine because peoples use activators and loaders to activate the Windows 7.But I see that this problem also happens for peoples that buy the original genuine Windows 7.I think this happens because of some issues while updating.
How To Make Windows 7 Genuine Using Command Prompt :
1. Start your Windows 7 2. Search for ‘ 3. Now right-click on CMD and then click on Run As Administrator to run the command prompt in Administrator Mode.

4. Now type the SLMGR –REARM command on Command Prompt and press Enter button to execute the operation.
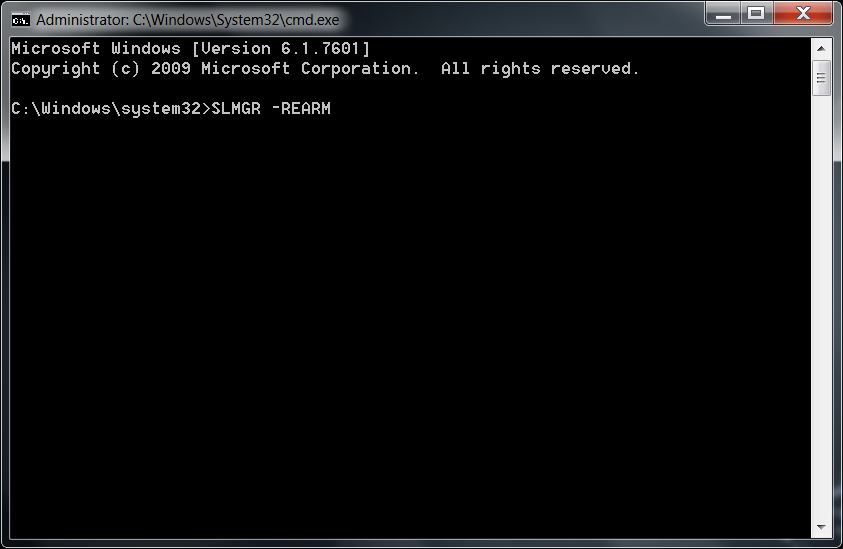
5. Now a message shows that command is completed and your system is need restart to complete the command properly.So restart your Windows 7 Computer or Laptop and after restarting your Windows 7 becomes genuine and ‘This copy of Windows is not genuine’ error will removed from your Computer or Laptop.

Now your Windows 7 Pc or Laptop is becomes genuine.So if you face any problems in making your Windows 7 genuine using command prompt then comment below or contact us by visiting our contact us page.If making Windows 7 genuine is not working for you then you can also use Remove WAT Utility to make your Windows 7 genuine.You can get download link and know more about it by Clicking Here.If you found this article helpful then share it with your friends and other Windows 7 users that are facing this problem.
Source fromhttp://www.trickzing.com
How to Save Google Maps Offline on Android and iOS
Google maps for android has been a reliable navigation system for me. It doesn’t matter where you are on earth, if you have access to a internet connection, google maps will help you find the way to your destination. But as we all know Google maps heavily depends on your phone’s data connection to download maps. When you are connected to a somewhat fast internet connection, loading maps on Google maps would be a breeze. But as soon as your connection speed drops, Google maps would take a long time to load maps.
This is where you can make use of Google Map’s new Offline mode for saving specific areas of a map onto your device’s storage. The offline storage mode is a new addition to Google maps, which was released just yesterday alongside the integration of Uber with Google now and Google maps. The updated version of Google maps is now available both for Android and iOS devices.
Before this new update, there was no such thing as a true offline mode in Google maps. However there were a few tricks by which you could cache offline maps for a specific area, but this was less than initiative.On the new version of Google maps, that is version 3.0 for iOS and version 8.0 for Android, the process of saving offline maps has become very streamlined.
For those who need to save a section of an map for offline use, the instructions below will show you how to save maps offline on the android version of Google maps.
How to Save Google Maps Offline
- Step 1: Update Google maps to the latest version from the links provided for the respective versions of the app at the bottom of this page.
- Step 2: Once you have the latest version of Google maps installed on your iOS or Android devices, launch Google maps.
- Step 3: Browse the map of a place which you want to save offline and tap on the profile icon next to the search bar.
- Step 4: On the next page, scroll to the bottom and tap on “ Save map to use offline “

- Step 5: You have now entered the offline maps section. Pan or Zoom the area of the map which you want to save for offline use
- Step 6: Tap on the Save at the bottom of your phone’s screen.

- Step 7: Type in a name for the saved maps and tap on Save to save the entire area of the map visible on your phone’s screen.

Google maps will now save the map for offline use. For those who have a slow data connection, you can use the offline mode in Google maps to save maps offline and later use them to navigate though the place. As for limitations, you should know that offline maps will be stored for a duration of 30 days, after which they will be purged to free up space on your phone.

Download: Google Maps for Android | Google Maps for iOS
Source fromhttp://www.techverse.net
Get 50GB of Free Cloud Storage with the new Box App on Your iOS Device
Popular cloud storage service Box has quietly announced the launch of its completely revamped iOS app for the iPhone and iPad. And with that, the company has even decided to give a whooping 50GB of free cloud storage to everyone who downloads the new Box app within the next 30 days. The free storage space is definitely more than its previous allocation of 10GB per new user.

According to Box, the revamped Box app is now deploys an entirely new user interface which makes the new app much faster than its previous versions. The new Box app is now capable of previewing more than 100+ file types and even supports full text search within documents.
With the new Box app, the company expects to offer the best user experience to securely store and manage data from mobile devices. The 50GB of free cloud storage is definitely a big attention grabber but what box actually wants to do is to create a big user base and eventually introduce new services to them like their own BoxNote. This seems like a good plan but feature wise box is still lagging behind its contenders.
You can download the Box iOS app to grab your complimentary free storage space of 50GB. Do remember the offer lasts till the 15th of february. Let your friends and family know about it so that they can benefit from it too.
Source fromhttp://www.techverse.net
How to Unlock iPhone 4S on AT&T without Jailbreaking
iPhone 4S does not have a jailbreak yet, but a developer has successfully unlocked this latest device from Apple. And the surprise is that this unlock method is so simple, it does not require any kind of software or hardware tweaks.

iPhone 4 and iPhone 3GS have been unlocked using Ultrasn0w, after jailbreaking. Other methods forunlocking include the Gevey SIM unlock, which requires you to insert a TurboSIM which acts as a SIM interposer.
A developer by the name Michael Capozzi has discovered a method that works only for AT&T models of iPhone 4S. Below are the steps on how to unlock your iPhone 4S on AT&T and use it on T-Mobile.
Disclaimer: Proceed at your own risk. We have not tested this method, and so cannot guarantee success. Also, we are not responsible for any damages caused to your device during unlocking.
Unlock iPhone 4S on AT&T
1. Insert AT&T SIM card in your iPhone 4S.
2. Dial 611 for AT&T customer service hotline and drop the call immediately.
3. Next, turn on Airplane Mode from the Settings menu.
4. Remove the AT&T SIM card and insert T-Mobile SIM card
5. Turn off WiFi. Also, make sure that the phone does not connect automatically to any networks by tapping on ‘Forget this Network’ for your default WiFi network.
6. Now turn OFF Airplane Mode.
7. Your iPhone 4S will start searching for a network, followed by the Apple splash screen, later followed by the ‘Activation Required’ screen.
8. Let EDGE network activate automatically. You should see the ‘E’ on the top left corner of your iPhone 4S screen.
9. Wait for 20 seconds and turn off the phone.
10. Switch your phone back again. You should see the ‘Activation Required’ screen once again.
11. When you see one signal bar, tap on ‘Use Cellular Connection’.
12. Eject SIM card, following which the ‘Activation Required’ screen is displayed for the second time.
13. Insert back the SIM card.
14. That’s it. Your iPhone 4S should now be unlocked!
Strange as the steps may seem, they seem to be working fine. So go ahead and give them a try, if you like to use your iPhone 4S on T-Mobile network.
iPhone 4S users may be already aware that currently, there is no jailbreak for their device. Though a successful jailbreak has been demoed on video, a public release is still far away.
Source fromhttp://www.dkszone.net
How to Fix iTunes Error 3194 while Updating/Restoring to iOS 5
Have you encountered iTunes error 3194 is while updating or restoring your iPhone, iPod Touch, or iPad to the latest firmware, iOS 5? Well, one reason this error occurs is that iTunes is unable to connect to Apple’s update server.

If you have previously jailbroken any iDevice, then your hosts file was definitely edited, even if it was not you who did it. Jailbreak tools such as TinyUmbrella also edit the hosts file by adding the following entry, that points to Cydia server.
74.208.10.249 gs.apple.com
This is done in case of downgrading an iOS firmware, an action which Apple does not otherwise allow. The hosts file entry is to trick iTunes into believing that it is talking to Apple’s servers, while in reality it is conversing with Cydia’s.
Coming back to the topic of this article, the same hosts file entry you have added while downgrading iOS firmware or while saving your device’s SHSH using TinyUmbrella, is responsible for the iTunes 3194 error.
How to fix iTunes Error 3194 while updating to iOS 5
Windows PC: Run Notepad as administrator (Windows 7/Vista) and open hosts file that can be found in C:WindowsSystem32driversetc folder.

On a Mac, the hosts file can be found in /etc/ folder. Open Finder and select ‘Go to Folder..’ from the Go menu. Type ‘/etc/’ and hit Enter. Right click on the hosts file and open it with TextEdit.

Find the following line in hosts file and add a ‘#’ in front of it. A ‘#’ is meant to comment out a line in the hosts file.
74.208.10.249 gs.apple.com
After editing, the above line should like the below one:
# 74.208.10.249 gs.apple.com
Now restart iTunes and try to update or restore your iPhone 4, iPhone 3GS, iPad, iPad 2, or iPod Touch 4G/3G to iOS 5. This time everything should work fine!
Source fromhttp://www.dkszone.net
Download iOS 5 for iPhone 4, 3GS, iPad 2, iPad, iPod Touch 4G/3G
Finally iOS 5 public version is out, after months of anticipation and waiting. A host of 7 developer betas and a final Gold Master candidate preceded this release of Apple’s latest and smartest firmware for their iDevices, including iPhone, iPad, and iPod Touch.
iOS 5 is available for download for iPhone 4, iPhone 3GS, iPad, iPad 2, iPod Touch 4G, and iPod Touch 3G. iOS 5 packs 200 new features compared to its predecessor, iOS 4.x. Some of the interesting ones includenotification center, iMessage, better Twitter integration at the OS level, Newsstand, a new app that lets you subscribe to magazines and newspapers, a new Reminders app, the ability to open camera app right from your device’s lock screen, and so on.

iOS 5 will come pre-installed on the recently announced iPhone 4S. This much anticipated next gen iPhone features higher hardware specs as well as a very irresistible software known as Siri, a voice activated personal assistant whose artificial intelligence is just mind blowing.
Download iOS 5 IPSW
Source fromhttp://www.dkszone.net
How to Turn Off Tips Notifications on the iPhone 5
One notable addition to your iPhone 5 after installing the iOS 8 update is the Tips app. This is meant to teach you about new feature introduced with the iOS update. However, you may find it unnecessary and wish to disable the notifications from the app.
Fortunately this is a setting that you can adjust with just a few short steps, so continue reading below and learn how.
Disable Notifications from the Tips App in iOS 8
The steps in this article were written using an iPhone 5 with the iOS 8 operating system. Earlier versions of iOS do not have the Tips app.
Step 1: Open the Settings menu.

Step 2: Scroll down and select the Notifications option.

Step 3: Scroll down and select the Tips option.

Step 4: Touch the button to the right of Allow Notifications to turn off all notifications from the Tips app. You will know that they are turned off when there is no green shading around the button, as in the image below.

The Tips app cannot be deleted, but you can hide it in a folder. Read here to learn how to add an app to a folder.
Source fromhttp://www.solveyourtech.com
How To Clean your RAM using Notepad

Many friends of me ask where can I download a software which can keep my RAM free? And I found thesesoftware are nothing but using some lines of code which can be implemented by using notepad or any editor tool. So if any one does not have any software, you can use it by doing the following things which I am going to mention.
Steps to Clean Your RAM Using Notepad:
Step 1: Open Notepad
Step 2: Type FreeMem=Space(10240000000)
Step 3: Save it as “CLEANER.VBS” in any location you like.
Step 4: You can edit the code and write 512 instead of 1024 if you own a 512mb RAM or change to anything you like.
Step 5: Run it !
Step 2: Type FreeMem=Space(10240000000)
Step 3: Save it as “CLEANER.VBS” in any location you like.
Step 4: You can edit the code and write 512 instead of 1024 if you own a 512mb RAM or change to anything you like.
Step 5: Run it !
After this final step your RAM will be free.
Source fromhttp://www.techpraveen.com
How to fix ”Unfortunately app has stopped” – Beginners alert!

Clearing up app storage
This problem often arises with the contacts, gallery and launcher apps, among many others. For example, I always receive the ‘Unfortunately contacts has stopped” error on my Galaxy S3 and it’s particularly annoying. The procedure to fix this is generally always the same.
- First, you must navigate to the settings on your Android smartphones.
- Scroll down until you see Application Manager or Apps, the name differs per Android device.
- Swipe left until you find the ‘All’ applications tab.
- Scroll down to the app that stopped and tap on it.
- Here you will clear the data and cache.
What you need to understand is that clearing the data will erase the changes made to the app’s settings, but not the actual content, like pictures in the gallery app for example. Cleaning the cache will get rid of saved data which allow apps to load much quicker when you launch them. Erasing this will only slow opening up an app a little bit, but will also help solve the problem.

Uninstall the app
If the app isn’t a built-in app, like Contacts for example, you can also try uninstalling and reinstalling the app again from the Google Play Store. Simply open the Play Store app and open the menu bar on the left hand side and tap on ”My apps”. Find the app in question and hit uninstall, which takes a few seconds. Atterwards, you can install it again.
Soft reset
You can also try doing a soft reset. This is super simple and is quite effective if your phone has been on for a long time. A soft reset will power cycle your phone, meaning turning it off and then back on again. This of course won’t delete anything. It’s a good idea to turn your phone off every few days for a few minutes and will help a sluggish phone with a variety of issues, whether app, network, audio, email issues and more.
In the case of Google Play itself not working, the solution is a little more extensive: delete the cache as a first step and if this doesn’t clear things up, you can then clear your data, and finally uninstall any Play Store updates. The same goes for Google Play services, but try these one by one, you don’t want to lose all your Play Store preferences for no reason. Check out the complete tutorial on what to do when the Google Play Store isn’t working.
Last resort: factory reset
In the worst case scenario when nothing is working, you can resort to a factory reset, but again, this really shouldn’t be done until no other option presents itself. When doing a factory reset, ensure that you have backed up all of your data beforehand. I repeat: backup all of your data first. I mean it. Do it. A factory reset will wipe your device to factory defaults, taking any bugs with it. You can then restore your apps and data afterwards.
Did this fix the problem for you? What others fixes do you know for these little pesky Android problems that you can share with your fellow beginner users?
Source fromhttp://www.androidpit.com
8 tips on how to protect your Android touch screen


2. Avoid letting your touch screen come into contact with other electrical devices. There are many people who think that magnets will damage your phone, when it fact it likely won’t. The only thing that a magnet might do is mess up your built-in magnetic sensor which is used for compass apps.
3. Electrostatic discharges, meaning a sudden surge of electricity between two connected electrical devices, could ultimately cause the touchscreen to malfunction. This might happen when your smartphone is placed near an object isolated to the ground that conducts electricity.
4. This may seem obvious, but do not tap your phone with any sharp objects or bang it to make it work if it’s being laggy. Your smartphone isn’t like your old TV set. Also, though you might get over excited while playing Candy Crush, do not apply excessive pressure to the display.

5. Ever heard of the term burn-in? This is what sometimes happens when you leave the touchscreen idle for an extended amount of time without deactivating the display. What you’ll see when you switch to something new is an afterimage, ghosting or screen burn-in, all terms apply here. If this is happening to you, check outhow to fix a screen burn-in. To prevent this from happening though, set the lock screen to turn off after a certain amount of time in the settings of your smartphone or tablet under the lock screen section.
6. Invest in a screen protector, sleeve, padded bag or hard case for your tablet or smartphone. There are many cheap but effective ones that you can find on Amazon, WalMart, eBay etc. If you drop your phone, scratches are the least of your worries, but shattering or cracking can happen even with the most durable of panels.

7. Avoid exposure to direct sunlight. Leaving your smartphone or tablet with an LCD display out on the patio in mid summer can really damage the quality.
8. When cleaning your display, use a microfiber cloth, which is ideal for touch screens. You can even use the one that came with your sunglasses. Be careful if using a moist cloth. Simply dampen it slightly or breath on the screen and then wipe it down gently. If you do end up using water, make sure that it is distilled water since normal tap water often carries calcium and other types of minerals. Do not over-rub. Let your phone air dry if there is any water left over so that you don’t accidently push any liquid into the phone’s inner hardware.
What tips do you recommend when it comes to taking care of your touch screen?
Source fromhttp://www.androidpit.com
Top 10 most useless features on Android

The O Touch panel – Oppo N1
The Oppo N1 has many useful features, but then there’s the touch panel on the back-side of the device, which goes by the name of O Touch. In theory, it was intended to provide the user with some quick gestures, like launching the camera by tapping it twice, for example. In practice, it’s a whole other story: the 4×4 cm panel on the back is hardly detectable. When attempting to use this feature, be prepared for bursts of frustration and hand cramps. The only advantage: if you don’t use it, it will leave you alone.
Digital fingerprint scanner - HTC One Max
Opinions on the HTC One Max are split right down the middle, but the objective here isn’t to aid either side of the argument. That being said, you have to admit that a smartphone of such an impressive size would be quite hard to handle one-handed, which is a digital fingerprint scanner wasn’t really such a clever idea after all. Not only is this feature not very useful, it’s pretty much impossible to use without making your life a lot more difficult. Next!

Screen capture with palm swipe – Galaxy S3 and S4
It’s not hard to see that Samsung has been trying to revolutionize the world of motion gestures for smartphones, but let’s face the facts: once you discover some of these new gestures on your device, the chances of you using them again after trying a first time are slim. One of these hand motions is the palm swipe to capture feature. For those who don’t want to do a little kung-fu Samsung-style overtop of the display, there is a simple button combination to take a screenshot on the Galaxy S3 and S4.

Augmented reality effects - Sony Xperia Z1 and Z2
It gets even better. The Sony Xperia Z1 and the Xperia Z2 provide users with a very interesting camera feature for video and pictures: you can add augmented reality effects. This means that, depending on which theme you choose, you’ll suddenly be wearing a scuba diving helmet with fish swimming around you, or it’s carnival and you get an afro….or dinosaurs star terrorizing the scene! The only reason to explain this function is that the developers were likely on the same stuff as Alice in Wonderland, because otherwise, I just don’t get it.
HTC picture stickers – HTC One (M8)
Just like the AR effects on the Sony Xperia Z1 and Z2, this one lands in the same category of randomness. The HTC One (M8) allows users to add stickers to their images. There are some very odd ones too, like colored sunglasses, cowboy hats, gold chains and even a gas mask. You might use it once or twice to ‘spice up’ your pictures, but soon this editing option will land in the abyss of useless features never to be seen again.

Smart gestures: face unlock – Galaxy S3 and S4
This is one of the most useless features that was ever created. Not only does the function to unlock the lock screen with your face not work in the dark, it’s not very secure. Having a code or pattern for an unlocking method is not only more secure, it doesn’t waste any of your precious time. Also, I don’t want to see my face every time I unlock my phone, which I do about every 30 seconds.
Sound & Shot – Galaxy S4
Here we go again with Samsung and the Galaxy S4 camera, which is full to the brim with various software features. One of these is Sound & Shot which records sound for 6 seconds after the picture is taken to add a little ‘’ambiance’. What you will likely hear is something like ‘move to the left, ok a little to the right….’.

Tap to unlock – Nokia X
LG was successful in creating the KnockOn feature where you tap twice on the screen in order to unlock the screen. It saves the users a few seconds of time, which is probably why Nokia decided to offer something similar with the Nokia X. The only thing is that Nokia added this function to the entire device, so front, back, etc, which means that the smartphone often turns on when sticking it your pocket or purse. This is more pesky than useful.
Eye scroll – Galaxy S4
It makes sense that Samsung would be in this list more than any other manufacturer, after all, they are the only ones that offer so many different features and some are bound to turn out useless. One of these is eye scroll, which like the name says, uses the movement of your eyes to scroll up and down on a page. The idea isn’t bad, but in practice, it’s the pits. Instead of actually helping, it just gets irritating.

Dual camera mode – Galaxy, HTC and LG smartphones
We’re sorry to keep ragging on Samsung, because in fact, we actually like the feature they present most of the time, but there are some you just have to ask yourself why! Samsung isn’t the only culprit from this next features, some newer LG devices also included it, as well as the HTC One (M8): dual camera mode, which activates the front and back camera at the same time, meaning your face will appear in a tiny box on the viewfinder image. It’s a funny image, that could be used to capture your expression in relation to your feelings about what you are taking a picture of, but aside form that, it’s just a gimmick
In your opinion, what software features do you consider to be useless on today’s Android devices?
Source fromhttp://www.androidpit.com
Subscribe to:
Posts (Atom)
