Showing posts with label Computer. Show all posts

Description of Virus:DOS/Rovnix.gen!

Today I am sharing an article to How to fix Windows 7 Not Genuine error because my friends and readers ask me to share the tutorial to make the Windows 7 genuine without using any Activator or Loader.After searching lot on Internet I found that we can also make the windows 7 genuine using Command Prompt in just 2-3 minutes.I tried this method on many computers of my friends and classmates  so today I am sharing this article with you so that you can also make your Windows 7 genuine and solve the ‘This copy of Windows is not genuine’ error.If you have lot of money then I recommend you to buy original Windows 7 or Windows 8for Microsoft.So if you want to fix windows 7 not genuine error using command prompt then follow steps that given below.

Why Windows 7 Becomes Not Genuine :

Windows 7 becomes not genuine because peoples use activators and loaders to activate the Windows 7.But I see that this problem also happens for peoples that buy the original genuine Windows 7.I think this happens because of some issues while updating.

How To Make Windows 7 Genuine Using Command Prompt :

1. Start your Windows 7 2. Search for ‘ 3. Now right-click on CMD and then click on Run As Administrator to run the command prompt in Administrator Mode.
How To Fix Copy Of Windows Not Genuine Error
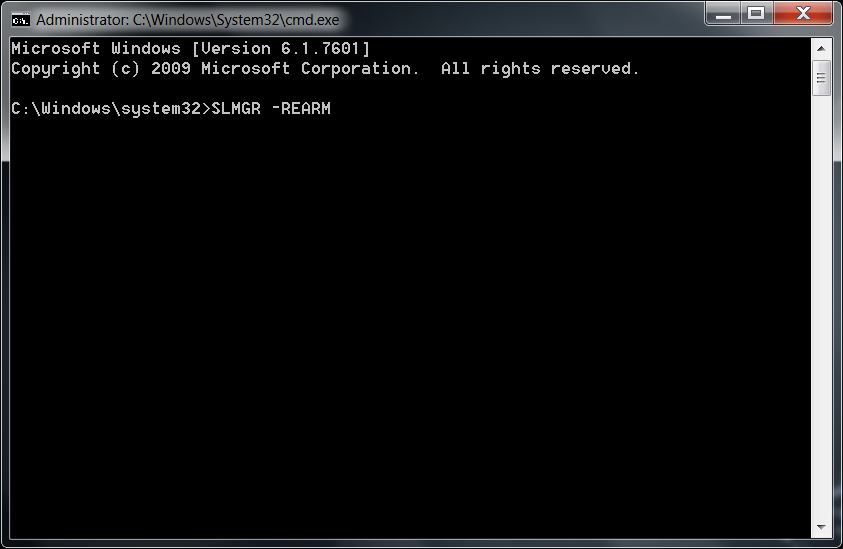
4. Now type the SLMGR –REARM command on Command Prompt and press Enter button to execute the operation.
Solve Windows 7 Not Genuine Error
5. Now a message shows that command is completed and your system is need restart to complete the command properly.So restart your Windows 7 Computer or Laptop and after restarting your Windows 7 becomes genuine and ‘This copy of Windows is not genuine’ error will removed from your Computer or Laptop.
Now your Windows 7 Pc or Laptop is becomes genuine.So if you face any problems in making your Windows 7 genuine using command prompt then comment below or contact us by visiting our contact us page.If making Windows 7 genuine is not working for you then you can also use Remove WAT Utility to make your Windows 7 genuine.You can get download link and know more about it by Clicking Here.If you found this article helpful then share it with your friends and other Windows 7 users that are facing this problem.
Source fromhttp://www.trickzing.com

How to Save Google Maps Offline on Android and iOS

Google maps for android has been a reliable navigation system for me. It doesn’t matter where you are on earth, if you have access to a internet connection, google maps will help you find the way to your destination. But as we all know Google maps heavily depends on your phone’s data connection to download maps. When you are connected to a somewhat fast internet connection, loading maps on Google maps would be a breeze. But as soon as your connection speed drops, Google maps would take a long time to load maps.
This is where you can make use of Google Map’s new Offline mode for saving specific areas of a map onto your device’s storage. The offline storage mode is a new addition to Google maps, which was released just yesterday alongside the integration of Uber with Google now and Google maps. The updated version of Google maps is now available both for Android and iOS devices.
Before this new update, there was no such thing as a true offline mode in Google maps. However there were a few tricks by which you could cache offline maps for a specific area, but this was less than initiative.On the new version of Google maps, that is version 3.0 for iOS and version 8.0 for Android, the process of saving offline maps has become very streamlined.
For those who need to save a section of an map for offline use, the instructions below will show you how to save maps offline on the android version of Google maps.

How to Save Google Maps Offline

  • Step 1: Update Google maps to the latest version from the links provided for the respective versions of the app at the bottom of this page.
  • Step 2: Once you have the latest version of Google maps installed on your iOS or Android devices, launch Google maps.
  • Step 3: Browse the map of a place which you want to save offline and tap on the profile icon next to the search bar.
tap on profile icon in google maps 225x400 How to Save Google Maps Offline on Android and iOS
  • Step 4: On the next page, scroll to the bottom and tap on “ Save map to use offline “
tap on save maps to use offline on android google maps How to Save Google Maps Offline on Android and iOS
  • Step 5: You have now entered the offline maps section. Pan or Zoom the area of the map which you want to save for offline use
  • Step 6: Tap on the Save at the bottom of your phone’s screen.
save google maps offline android and ios How to Save Google Maps Offline on Android and iOS
  • Step 7: Type in a name for the saved maps and tap on Save to save the entire area of the map visible on your phone’s screen.
type in a name for the saved offline maps How to Save Google Maps Offline on Android and iOS
Google maps will now save the map for offline use. For those who have a slow data connection, you can use the offline mode in Google maps to save maps offline and later use them to navigate though the place. As for limitations, you should know that offline maps will be stored for a duration of 30 days, after which they will be purged to free up space on your phone.
offline maps being saved on android ios google maps 1 How to Save Google Maps Offline on Android and iOS

Source fromhttp://www.techverse.net

How To Clean your RAM using Notepad


Cleaning your RAM using notepad
Many friends of me ask where can I download a software which can keep my RAM free? And I found thesesoftware are nothing but using some lines of code which can be implemented by using notepad or any editor tool. So if any one does not have any software, you can use it by doing the following things which I am going to mention.
Steps to Clean Your RAM Using Notepad:
Step 1: Open Notepad
Step 2: Type FreeMem=Space(10240000000)
Step 3: Save it as “CLEANER.VBS” in any location you like.
Step 4: You can edit the code and write 512 instead of 1024 if you own a 512mb RAM or change to anything you like.
Step 5: Run it !
After this final step your RAM will be free.
Source fromhttp://www.techpraveen.com

How to run Android App on Pc

Needless to say that Android apps are becoming more and more popular when compared to different mobile OS. People are now moving on to use various Android apps and games on their PC’s. Yeah, you heard it right!
Due to many barriers and some other reasons, many of us wants to use Android apps or Android games on our PC. Some of such apps include WhatsAppLineAngry Birds and so on. Well, you can also do the same. For this, some sort of applications can be deployed to use, to be specific, Android Emulators, and one such Android emulator is BlueStacks. You can download BlueStacks for PC freely as it is available as a freeware. Although there are several other similar android emulators, but they aren’t free or lags in the functions and features.
Bluestacks-for-PC

Download BlueStacks For PC

Interface and Controls

BlueStacks is a simple to use Android emulator that contains some extensive features. It is freely available to download and gets installed in few minutes. The application will automatically set the environment variables and other system integration. However, there are certain packages that you might need to install including Java Runtime Environment, Android Runtime Environment and some others too.
The interface is quite different and will be a complete surprise, particularly if you’re expecting an Android like GUI. The top sliding notifications menu is hidden on the main screen where you can see that the running apps. The buttons are provided on the screen for back key, home key and for menu key. Settings do have a dedicated key, which is quite figurative by its button. Settings include accounts and sync, uninstaller, etc.
Bluestacks-Offline-Installer

Performance, Tweaks and Key Features

Bluestacks runs without any lags, unlike your phone, which might experience lags some times. The basic difference between the two is that you cannot root OS installed on Bluestacks as it is already rooted. Also, the application will automatically detect the processor of your PC, and you can check this using some specific applications. This further gives an implication of your CPU being directly responsible for how so ever the Bluestacks responds. It will completely depend on your computer’s configuration. Talking about tweaks, you cannot apply any as you might be doing with your android device. Although you may use some sort of disk cleaners and RAM boosters to keep clean your device cache.

How to Use BlueStacks?

Using this Android emulator is very simple. Main screen consist of four tabs of which you will be landed to the app list by default. Here you can find all the inbuilt apps which come loaded in the Bluestacks. If you wish to add a new app then you can download the apps from either popular apps section or app search. Popular apps section contains the list of the entire most downloaded app whereas you can make a search for a specific app in the app search tab. When downloading for the first time, you will be prompted to add a Google account to your dashboard, which cannot be skipped. Also, for using more such app markets, you will need to sign to their respective accounts. This is required once; next searches will be carried seamlessly without any interruption.
Bluestacks-for-Windows
One effective feature in the same field is that the app uses all the market apps to index the application. There are two market available by default viz 1Mobile Market and Amazon App Store. You can also install Google Play Store, of which the process will be same as that required for installing other apps and games.
Source fromhhttp://www.techfeb.com

Increase battery life of laptop Easily

Every laptop or Netbook user these days have the same headache of limited backup time of batteries. As far as your system is new , you will have a good backup time but when it becomes a few months old you will definitely face problem of limited battery life.
So here I am giving you a solution to Increase battery life of laptop upto a sufficient extent.
There is an inbuilt command in your computer to Increase battery life as well as the performance of the system but not all users are aware of it. Some laptops directly provide an interface with option termed as “ POWER SAVING MODE ” but  if your laptop is old or don’t have this feature by default , you need not to worry because you can do the same task manually.
Also read this Awesome Notepad Tricks
If you have a laptop with Windows 7 installed, you can use the ‘powercfg‘ command . It will display useful information about your laptop’s energy consumption and usage. If  you can understand and maintain  it correctly then you can extend your Battery life and performance by great amount.

Steps to Increase battery life of  laptop


Step 1: Click on the Start Menu and type “ CMD ” in the Start Search bar.
Step 2: The search will start and it will then display an icon of “ CMD ” . simply right click on it and select Run as administrator.
Step 3: It will open command line, now simply run the command “powercfg -energy” without quotes. (For windows 7 users.)
 
Windows 8 users can Simply run the command “powercfg /energy” without quotes.
Step 4: Now Press “Enter”.
Once you successfully execute this command , Windows  will run a complete scan of  your system and it will find some ways to improve performance and power efficiency.
The results of this process will be saved to an HTML file, which is commonly  present  in the “System32”folder of most of the systems.
To access this file, simply follow the path which will be displayed in command prompt window after completion of the command. Read This file to understand that what program in your system is consuming more power and degrading the performance. Fix the Problem to Increase battery life of laptop.

Some More Usefull Tips to Increase battery life


  • Eject or Remove External Devices like Pendrive/DVDs/External HDD if not in Use
  • Run Apps that don’t Eat up much RAM
  • Disable Bluetooth of your Laptop if not in use.
  • Reduce Screen Brightness, This takes away lot of your battery, Reducing Brightness will help
  • Turn of Internet if you are not using it.
  • Make sure your Laptop’s Temperature remains Low
I am quite sure Performing these Tasks will help you to Increase battery life of laptop.
Source from http://www.smarttricks.net

How to Recover Deleted Files From External Hard Drive

Below are a few simple steps to help you Recover Deleted Files from some external hard drive.
1.Prevent any further modifications in the drive you need to recover your data from : If you have clicked on the delete button accidentally, and you need to get your data back, then the most important thing you must keep in mind is that you should not try to make any amendments in the files on the drive. This means do not delete any other data, or add any data to the file. Just stop using it, and follow the proceeding steps.

2.Download a file Recovery Software from Internet (Recuva) : Simply browse to Google, and search for some file recovery software online. You will get a good list of results, and you can choose to select any one of them after reviewing their features and other details.
 
Recuva is one of the most popular applications with some good reviews, and you may try it.

3.Install the Software and Follow the Instructions : Once you find the appropriate software, you may proceed to install it on your system, and then run it. It would then provide you a list of drives connected to your computer. Simply select the drive you need to recover drives from, and start the scan. It would then provide you a list of files which existed on the drive in the past. Depending on the size of the drive, it may take time accordingly.

4.Choose the files : After the list has been generated, all you need to do is tic mark the files you want to recover, or select all if you need them all, and simply click on “Recover” button.

Some other Recovery Softwares to Recover Deleted Files:
Apart from Recuva, there are several other free tools available in the market online which may help you with the Recover Deleted Files The names include Puran FileRecovery, Glary Undelete, SoftPerfect File Recovery, Pandora Recovery, Restoration, Avira UnErase Personal, Free Undelete, ADRC Data Recovery Tools and CD Recover Toolbox.
All these applications are completely free of cost and has a user friendly interface. You may simple type “file recovery software” in Google to catch the best results, or query “download recuva” to directly take you to the download pages.
Source from http://www.smarttricks.net

How To Make Windows 7 Genuine Using CMD

Today I am sharing an article to How to fix Windows 7 Not Genuine error because my friends and readers ask me to share the tutorial to make the Windows 7 genuine without using any Activator or Loader.After searching lot on Internet I found that we can also make the windows 7 genuine using Command Prompt in just 2-3 minutes.I tried this method on many computers of my friends and classmates  so today I am sharing this article with you so that you can also make your Windows 7 genuine and solve the ‘This copy of Windows is not genuine’ error.If you have lot of money then I recommend you to buy original Windows 7 or Windows 8for Microsoft.So if you want to fix windows 7 not genuine error using command prompt then follow steps that given below.

Why Windows 7 Becomes Not Genuine :

Windows 7 becomes not genuine because peoples use activators and loaders to activate the Windows 7.But I see that this problem also happens for peoples that buy the original genuine Windows 7.I think this happens because of some issues while updating.

How To Make Windows 7 Genuine Using Command Prompt :

1. Start your Windows 7 2. Search for ‘ 3. Now right-click on CMD and then click on Run As Administrator to run the command prompt in Administrator Mode.
How To Fix Copy Of Windows Not Genuine Error
4. Now type the SLMGR –REARM command on Command Prompt and press Enter button to execute the operation.
Solve Windows 7 Not Genuine Error
5. Now a message shows that command is completed and your system is need restart to complete the command properly.So restart your Windows 7 Computer or Laptop and after restarting your Windows 7 becomes genuine and ‘This copy of Windows is not genuine’ error will removed from your Computer or Laptop.
Now your Windows 7 Pc or Laptop is becomes genuine.So if you face any problems in making your Windows 7 genuine using command prompt then comment below or contact us by visiting our contact us page.If making Windows 7 genuine is not working for you then you can also use Remove WAT Utility to make your Windows 7 genuine.You can get download link and know more about it by Clicking Here.If you found this article helpful then share it with your friends and other Windows 7 users that are facing this problem.
Source fromhttp://www.trickzing.com

Top And Best Windows7 Tips And Tricks

Windows-7-tricks-tips-hacks-2014
Today we leave some tricks and tips on how to get more from Windows 7 applications .
Windows 7 has become the fastest selling operating system in history, ahead of Windows XP . The system is already present in more than half of the world’s computers. Microsoft recently announced that its sales reach the not inconsiderable figure of 630 million copies sold . Undoubtedly, this is a fairly complete and stable system, which also has a huge amount of tricks that can help improve the use and performance. Here is a listof the 10 best tips for Windows 7 .
 
  1. Open Windows Explorer : press the Windows key + E to open a new browser page.
  2. Windows Action Center : provides important information about your PC, like the Antivirus Status, updates, troubleshooting, and also provides an option of scheduling backups. To do this go to Control Panel> System and Security> Action Center.
  3. This option gives you an explanation of the problem and how I should fix it.
  4. Hide notification oF system : since they are never useful, sometimes you prefer to disable them. To do this you must double-click the notification area icon in the Control Panel. There you can change the icons and notifications for the Activity Center, Network, Volume, Windows Explorer, etc.
  5. Disable safety messages : Control Panel – Activity Center and can disable notifications as Windows Update, Setup Internet security, network security, spyware and protection, control user accounts, virus protection, copies of Windows Security, Windows troubleshooting or verifying updates.
  6. Run a program as an administrator : Ctrl + Shift.
  7. Automatic arrangement of desktop icons : now only need to press F5 to rearrange the icons on the desktop. However, this trick is only valid when they are few.
  8. Encrypt USB : encrypt a USB drive has never been easier. You can now click the right mouse button on the removable drive and then on Enable BitLocker.
  9. Create a system repair disc : Windows 7 includes a tool that lets you create a bootable disc repair system that includes some system tools and the command line. Press the Windows key and system repair disc
  10. Hard-Link Migration Store : used to migrate files, settings and user accounts.
Source fromhttp://www.trickzing.com

How to bring back the Start menu and button to Windows 8

Share This article

You’ve just installed Windows 8.1 for the first time, or perhaps bought your first Windows 8 PC. After poking around for a bit you’ve finally found your way to the Desktop. What’s that in the bottom left corner? It sure looks like the Start button… but click it, and you’ll be rewarded with a hideous new Start screen, not the Start menu that you know and love from Windows 7 and Vista. For some reason, despite a series of updates over the last two years that are meant to make Windows 8 more user friendly for mouse-and-keyboard users, Microsoft is still forcing us to use the Metro interface instead of a real Start menu.
The good news is, despite Microsoft’s best efforts to ensure that the Start button and menu remain banished from its new OS, there are a bunch of third-party Windows 8 Start menu replacement apps that you can download today. Really, it just goes to show how devoted the Desktop Windows userbase is: Microsoft completely stripped out the underlying Start menu code to quash potential Luddite revolutionaries, and yet months after the release of Windows 8 there were dozens of Start menu and Start button replacements — some of which are far superior to Microsoft’s own Windows 7 Start menu.
For what it’s worth, Microsoft has finally kowtowed to user demand and will bring back the official Start menu in a future update to Windows 8 — but there’s still no word on when that might be. For now, if you want the Start menu on Windows 8, take a look at our list of the best, cheapest, and most authentic Windows 8 Start menu replacements.

Windows 8 Start button and menu replacements

Windows 8 Start menu replacement: StartIsBack

StartIsBack

If you want a Windows 8 Start menu replacement that looks exactly like Windows 7, StartIsBack is for you. You get the same Start button orb icon, the same Start menu search box, the same jump lists, and — for better or worse — even the same Aero transparency! As you can see in the screenshot above, StartIsBack even detects if your system needs to restart to apply some patches; it really is just like the Windows 7 Start menu.
Where StartIsBack diverges from the Windows 7 Start menu, though, is configurability: StartIsBack is fully customizable, and includes a handful of useful Windows 8-specific features, too. You can configure which hot corners are enabled, make your PC jump straight to the Desktop when it first boots up, and configure a key combo to show the Windows 8 Start screen (Win+Ctrl by default). If Start menu and taskbar transparency aren’t your thing, StartIsBack lets you disable it — and you can change the Start button orb icon, too. If you want a Windows 8 Start menu replacement that feels just like Windows 7, StartIsBack is for you.
Download StartIsBack ($3, free 30-day trial)
Windows 8: Pokki Start menu replacement

Pokki

Where StartIsBack tries to replicate the Windows of yesteryear, Pokki (free) is very much its own beast — and as much as I love the Windows 7 Start menu, I have to admit that Pokki is probably even better. It utilizes a neat “pinning” system that isn’t unlike the home screen of your smartphone or tablet (though I would argue that the Windows taskbar/superbar still does a better job). You can also add widgets to Pokki, such as Gmail or Facebook, which display your latest email or status updates.
By default, Pokki will configure your Windows 8 system to boot straight to the Desktop — and there is an option that will just completely disable the hot corners, if you so desire. (Remember, Win+C pops open the Charms menu, if you need.) If you’re looking for a Windows 8 Start menu/button replacement that isn’treminiscent of Windows Vista/7, Pokki is for you.
Windows 8 Start menu replacement: StartMenu8

StartMenu8

If you want the Windows 7 Start menu look-and-feel, but you’re not prepared to fork out a few dollars for StartIsBack or Start8, StartMenu8 is a solid alternative. While the interface won’t win any prizes — it feels a lot like the early Linux apps that ruthlessly ripped off Windows — you get a fair amount of configurability, and a handful of Windows 8-specific toggles that are very useful.
By default, StartMenu8 will skip the Windows 8 Start screen and go straight to the Desktop, and disable Windows 8′s hot corners. There’s also the option to disable the sidebar, if you really don’t ever want to see Windows 8 ever again. The StartMenu8 button icon can be altered, and you can add and remove which links appear up the right side of the Start menu. Overall, StartMenu8 looks and feels a bit clunky — and, incidentally, watch out for some delicious bundleware during the installation process.
Source fromhttp://www.extremetech.com

2014 © Movieism
RealMag theme by Templateism - Published By Gooyaabi Templates | Powered By Blogger